The natural place to start on the topic of proofreading for scanlation is a step-by-step guide. After all, typesetting guides talk about each step it takes. Redrawing guides talk about stamps, patches, and other tools. Cleaning guides tell you to burn this and dodge that until nirvana is reached. I’ll even bet this is the first link you clicked on after looking at the available topics.
Unfortunately, there is no step-by-step guide to proofreading. You simply read the translation. That’s basically it. As you read, you there are factors to consider and those factors will be the topics of this blog. We’ll discuss the target audience, the rules of grammar, the differences between Englishes and from Japanese. There are pitfalls that translators often fall into as well as common mistakes that new proofreaders make.
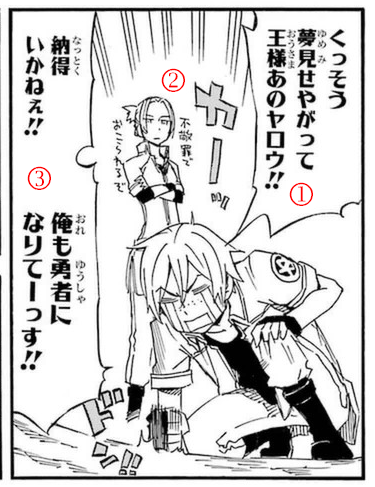
Still, there are some general guidelines that I can give to get the new proofreader ready to start. Proofreading has tools like the other roles in scanlation but one of them is not Photoshop, but an image viewer is still necessary. (I like irfanview.) As you read the script (what I call the translation produced by the translator and refined by the proofreader), you will want to reference back to the original image. The lines in the text document won’t always conform to bubble after bubble because manga isn’t just a collection of bubbles. For example:
1: He said
2: Do I really look like that?
3: he didn’t want to go with you!
It’s a simple example but at first glance, the proofreader might be tempted to punctuate it as “He said, Do I really look like that?” and capitalize “He didn’t want to go with you!” as a separate statement. When you look at the raw image, you’ll see that there is a non-bubbled comment between the two bubbles meaning that what he said was that he didn’t want to go with you, and the question of what the speaker looks like is not related to the conversation.

So, you need image viewer to look at the original, but you also need whatever program your group uses to keep the script in. One group I worked with used Microsoft Word while another used OpenOffice spreadsheets. I’ve also seen TXT documents, RTF documents, and Google Docs. A good general purpose reader is LibreOffice but make sure that you save the script in whatever format that the rest of the group uses. I liked using Google Docs, too, if the translator is active. It allowed the translators to see what changes I was making and to come back if they thought I misunderstood what was being said. I could also put questions directly into the script where the question occurred that the translator could respond to directly.
Those are the only tools you need, and now that you have them, it’s time to begin proofreading. You, obviously, have to read the script. I suggest reading it twice. The first time, read it as if you’re reading the manga as the end reader. Get familiar with the what happens, and get a feel for the flow. I also suggest reading it out loud. The mind will often quietly fix a mistake when you get into reading that is harder to hide if you’re repeating what you read. As you read, look for things that make you scratch your head, phrases that are hard to say or sound unnatural, and anything that interrupts the flow of reading. Worry about the nitty-gritty rules like punctuation until the second reading. Take the image used in the header. There is comma that shouldn’t be there but it doesn’t really affect the reading. The wording does. The original, “A lady who takes a monster hostage to threaten the demon king, and then gives him an aphrodisiac!”, makes it sound like the lady gave the monster an aphrodisiac when, if you read further, you realize she gave the demon king the drug. The comma, while wrong, doesn’t interrupt the flow, so don’t worry about correcting with the first out-loud reading.
After going over the script once, now go back over it line-by-line. Look for the non-obvious grammatical errors. This reading is where most punctuation mistakes are corrected and misspelled words are fixed. I have found that when I get lazy and try to do both types of fixes in one pass, I miss things.
That’s it for a step-by-step guide. Stay tuned for some of the things you’ll find and what to do about them in the upcoming posts.
